A Step-by-Step Guide to Installing Solar Panels on Roofs

You’re thinking about harnessing your roof’s unused space, but the process of fitting solar panels can look like a maze of brackets, wiring, and permits. Relax—you don’t need to be an engineer to follow each stage. 

This step-by-step overview walks you through the practicalities, from assessing roof angles to flipping the breaker on installation day. For deeper detail at each milestone, check our concise solar panel installation guide right here.

Planning Your Solar Layout

Start by imagining sunshine as water flowing across your roof; the goal is catching the deepest stream. Mapping that flow correctly guarantees years of effortless, free electricity.

Sketch the Array Footprint

Print an aerial image from satellite software, trace obstacles, and mark rafters. A scaled drawing eliminates surprises once ladders, rails, and panels arrive onsite.

Orient for Production

In North America, a south-facing tilt between fifteen and forty degrees yields peak output. East-west roofs still deliver value when array size offsets orientation losses.

Account for Shade

Note chimneys, trees, and neighboring structures each hour with a smartphone sun-tracking app. Removing a single branch can add hundreds of kilowatt-hours annually.

Leave Service Aisles

Create twelve-inch gaps so future technicians can reach mid-array junction boxes and roof penetrations. Accessibility today prevents expensive panel removal tomorrow.

Plan Conduit Runs

Plot the shortest, prettiest path to the service panel. Fewer bends, painted to match exterior walls, keeps both voltage drop and homeowners’ associations happy.

Roof Assessment Checklist

A thorough inspection ensures your roof lasts longer than the solar hardware. Follow this organized checklist before ordering the first rail or microinverter.

  • Verify Structural Soundness: Confirm sheathing thickness and truss spacing meet local code for additional dead load plus wind uplift factors.
  • Document Roof Age: Asphalt older than fifteen years may need replacement to avoid panel removal for reroofing later.
  • Inspect Flashing Zones: Identify soft spots, previous patches, and water stains that hint at hidden rot beneath shingles.
  • Measure Rafter Pattern: Use a stud-finder inside the attic to mark true centers; accuracy prevents missed pilot holes topside.
  • Review Fire Setbacks: Local ordinances often require three-foot pathways at ridges and hips for firefighter access.

Photograph every finding, upload to cloud storage, and share with your installer or engineer; transparent records speed permitting and protect future warranty claims.

Calculate Energy Demand

Knowing how many kilowatt-hours you actually consume prevents overspending on extra panels. Precision here equals shorter payback and higher lifetime return.

Pull Utility Data

Download twelve months of billing history and list seasonal spikes like air-conditioning or holiday lighting; annual totals guide system sizing assumptions.

Model Production Online

Enter your address into the NREL PVWatts Calculator. Adjust tilt, azimuth, and losses so predicted output mirrors your roof reality.

Right-Size the Array

Divide yearly consumption by PVWatts’ kilowatt-hours per kilowatt figure to estimate direct-current array size. Aim for ninety-five percent offset to dodge net-metering caps.

Plan for Future Loads

Add capacity if electric vehicles, induction ranges, or heat pumps loom on the horizon. Designing once is cheaper than expanding later.

Secure Permits Required

Navigating paperwork may feel tedious, yet approvals shield you from fines, forced removals, and denied utility interconnection. Treat permitting as a parallel construction phase.

Research Jurisdiction Rules

City, county, and utility requirements differ. Start at the building department website, then call a clerk to confirm current fee schedules and inspection backlogs.

Prepare Plan Set

Provide stamped structural calculations, electrical one-line diagrams, and datasheets. Many authorities now accept digital submissions, reducing trips downtown.

Apply for Interconnection

Utilities often process paperwork separately. Submit inverter specifications early so the grid-impact study proceeds while roof work begins.

Understand Inspections

Most regions demand rough-in and final walk-throughs. Scheduling inspectors promptly avoid panels sitting idle while sun blazes overhead. Federal resources at energy.gov outline nationwide best practices you can cite if local guidelines lack clarity.

Tools And Safety Gear

Solar installation blends carpentry, electrical work, and rock-climbing. Equipping yourself properly protects bodies, shingles, and expensive silicon wafers.

  • Full-Body Harness: Rated for rooftop fall arrest, paired with reusable anchors screwed into rafters under flashing.
  • Torque-Controlled Impact Driver: Prevents overtightening lag bolts and preserves manufacturer warranties.
  • Module Carrying Handles: Specialized grips from industry vendors ease panel transport and reduce cracked glass.
  • Digital Multimeter: Confirms open-circuit voltage before connecting strings to the inverter.
  • Non-Conductive Gloves: Insulate hands while handling energized wires on bright days.

Lay tools on foam pads, never directly on shingles; errant metal edges can tear granules and create future leak paths.

Conduct Pre-Install Survey

A professional site survey transforms back-of-napkin dreams into engineered reality, ensuring performance estimates survive contact with real rooftops.

Laser Measurements

Technicians capture precise eave lengths, ridge heights, and obstruction distances. Accurate data prevents change orders when components arrive cut to spec.

Electrical Service Review

Main breaker capacity, busbar rating, and meter placement dictate whether upgrades or supply-side taps are necessary for code compliance.

Shading Analysis

Tools like Solmetric SunEye quantify hourly shade losses; results guide optimizer or microinverter decisions where uniform irradiance is impossible.

Critter Guard Planning

Including mesh barriers in the design blocks squirrels from chewing conductors, protecting both energy yield and homeowner sanity.

Mount Roof Attachments

Attachments anchor the array into rafters, transferring wind and snow loads safely. Precision here eliminates future leaks and structural woes.

  • Locate Rafters Precisely: Pilot-drill through shingles where attic marks indicate centerlines, confirming solid wood before enlarging holes.
  • Apply Sealant Generously: Fill every pilot with high-grade roof sealant prior to lag insertion for belt-and-suspenders waterproofing.
  • Slide Flashing Under Shingles: Minimum three-inch overlap directs water away from penetrations, preserving manufacturer roofing warranties.
  • Tighten Lags to Spec: Use torque wrench settings recommended by mounting manufacturer, preventing crushed rafters or loose connections.
  • Stage Standoff Heights: Maintain uniform elevation so rails sit perfectly level, avoiding panel stress and water ponding.

Complete one attachment row, check with a laser level, then replicate across the array; micro-adjust early to avoid cumulative errors.

Install Mounting Rails

Rails act as the backbone, aligning modules into a seamless, storm-ready plane. Taking extra minutes now means decades of rattle-free service.

Snap Chalk Lines

Reference manufacturer spacing from ridge and eave, then pop vibrant chalk for visual guidance while fastening rails above multiple attachments.

Square and Level

Shim standoffs where rafters dip, aiming for rail variance under three millimeters. A straight foundation simplifies module placement dramatically.

Bond and Ground

Install rail splice bars with integrated grounding-pins or dedicated jumpers; continuous equipment grounding is non-negotiable under electrical code.

Double-Check Span Charts

High-snow or high-wind zones often require shorter spans between attachments. Adhering to tables prevents mid-winter sag or flutter.

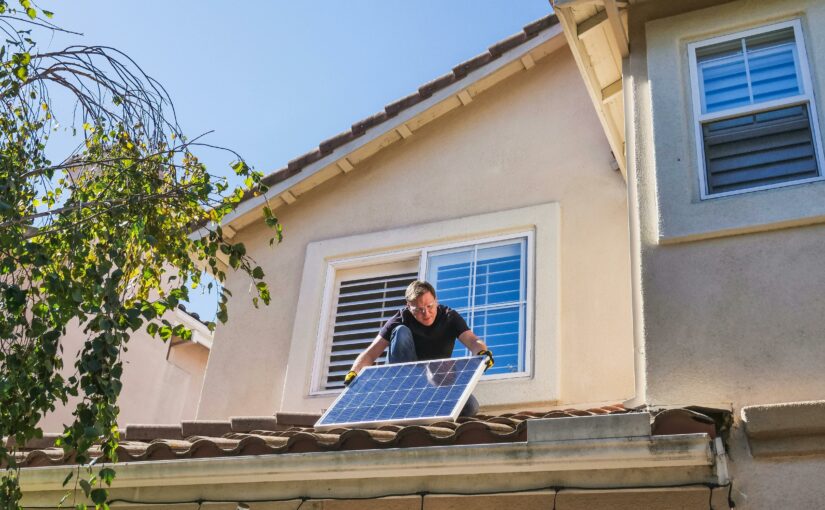
Position Solar Panels

With rails gleaming and grounded, it’s finally panel time—the moment neighbors notice your roof becoming a personal power plant.

Dry-Fit First Row

Set initial modules without hardware, verifying overhang from rail ends equals manufacturer guidance for aesthetics and load distribution.

Secure with Mid-Clamps

Tighten clamp bolts uniformly, watching integrated ground teeth bite anodized frames; inconsistent torque can cause micro-arcing over years.

Establish Consistent Gaps

Use spacer blocks to keep one-inch airflow channels between rows, reducing heat buildup and improving module efficiency on hot afternoons.

Complete the Array

Work upward in columns, passing panels hand-over-hand to avoid sliding glass. A rhythmic assembly line minimizes rooftop traffic and time aloft.

Wire Panels And Inverter

Electrical connections transform sunlight into usable power—treat each step with respect, caution, and the diligence it deserves.

  • Document String Plan: Label rails with string numbers so polarity and sequencing remain clear even after lunch breaks.
  • Use MC4 Disconnect Tools: Never yank connectors by hand; specialized wrenches protect locking tabs from breakage.
  • Route Cables Neatly: Clip conductors under rails using UV-rated ties, preventing abrasion against shingles or sharp metal edges.
  • Test Voc and Isc: Measure open-circuit voltage and short-circuit current to verify every module contributes expected output.
  • Land Wires in Inverter: Follow torque charts, attach equipment-grounding electrode conductor, and program settings before re-energizing branch circuit breakers.

Monitor production through the inverter’s app; baseline data today helps diagnose anomalies months or years in the future.

Power Up

You now have a clear path from planning to performance checks. Follow each stage methodically, document every reading, and revisit bolts and cables after severe weather. If you later expand the system to charge an electric vehicle, consult this concise installation guide for compatible wiring and safety.

What Does a Licence to Alter Cover — And What It Doesn’t

(Understanding what really needs freeholder approval before you start knocking down walls)

If you own a flat in London and you’re planning to change anything about it, chances are you’ve already come across the phrase “Licence to Alter.”

It sounds like something out of a legal handbook — formal, dry, maybe even unnecessary — but it can absolutely make or break your project. Get it wrong, and you might find yourself rebuilding a wall you’ve just paid to remove, or worse, in a dispute with your freeholder that drags on for months.

So, what exactly does a Licence to Alter actually cover? And what doesn’t it?

Here’s a straightforward look at what you really need to know before you start making changes to your flat.

What a Licence to Alter Actually Is

In simple terms, a Licence to Alter (LTA) is written permission from your freeholder or landlord allowing you to make specific changes to your property.

Most leases in London say something like:

“The leaseholder shall not make any alterations or additions to the property without the prior written consent of the Landlord.”

That’s it — one sentence. But that line carries a lot of power.

The reason is simple: it protects the building’s structure, safety, and long-term value. In many London conversions, one person’s ceiling is another person’s floor. What feels like a harmless improvement in your living room could easily become a hairline crack or leak in someone else’s.

What’s Always Covered by a Licence to Alter

Let’s start with the easy part — the things that almost always require formal consent.

1. Structural changes

If you’re removing or altering anything structural — a load-bearing wall, a chimney breast, or even adding a new steel beam — you’ll need an LTA. No exceptions. These changes affect the overall stability of the building.

2. Plumbing or drainage alterations

Moving your kitchen or bathroom might seem simple, but you’re connecting into shared risers and drainage stacks. That means potential impacts on water pressure, drainage, and even fire safety. Always get approval first.

3. Electrical or mechanical installations

Adding air conditioning, underfloor heating, or recessed lighting means new wiring, ducts, or holes through ceilings. Freeholders will want reassurance this won’t damage fire compartments or cause overheating.

4. External openings and windows

Changing window styles, glazing, or adding rooflights affects the building’s appearance — and in conservation areas, it can trigger planning permission too.

5. Hard flooring

This one surprises people. Replacing carpet with wooden flooring often needs consent, especially in mansion blocks or conversions. The reason is sound transmission. Freeholders must protect neighbours from impact noise, and many leases explicitly restrict hard flooring.

6. Fire-safety or structural upgrades

Replacing fire doors, ceilings, or insulation layers might seem like maintenance, but they can alter fire performance. Since the Building Safety Act, freeholders and managing agents are paying much closer attention to this kind of work.

What Usually Doesn’t Need a Licence to Alter

There are plenty of things you can do without formal consent — but always double-check your lease, because they’re all written slightly differently.

1. Decorative works

Painting, wallpapering, and updating your fittings are fine. You don’t need a licence to refresh your home.

2. Like-for-like replacements

New carpet for old carpet, fresh tiles in the same bathroom — no problem. As long as you’re not moving walls or changing services, you’re safe.

3. Built-in furniture or joinery

Adding wardrobes or shelves is fine, provided you’re not fixing into structural walls.

4. Temporary or freestanding features

Anything removable — like a kitchen island or partition screen — doesn’t require consent.

The Grey Areas (Where People Get Caught Out)

This is where most London flat owners get into trouble — the small things that don’t look like alterations but actually are.

For example:

Moving your kitchen a few metres across the room (still plumbing).

Swapping carpet for engineered oak (acoustic impact).

Adding recessed downlights in a ceiling (fire and heritage implications).

Repositioning radiators (services and pressure balance).

It’s rarely the big, obvious changes that cause disputes. It’s the subtle ones that seem harmless until the managing agent asks for proof of consent.

Before you spend a penny on drawings or contractors, dig out your lease and read it carefully. Every building is different, and what’s fine in one block might be prohibited in another.

Why It Matters More Than You Think

Skipping a Licence to Alter can create serious problems later. If you ever sell your flat, the buyer’s solicitor will ask for evidence of freeholder consent for any alterations. If you can’t produce it, the sale can stall — or collapse altogether.

There’s also the risk of enforcement. A freeholder can, in extreme cases, insist that unapproved works are removed and reinstated to their original condition — at your expense.

Handled properly, the process protects you. It proves that the works were approved, safe, and compliant. It also reassures future buyers and surveyors that nothing has been done that could compromise the building’s structure or fire safety.

Common Pitfalls Leaseholders Face

Across London, certain mistakes crop up again and again:

Starting work before consent is granted. Managing agents notice, and it creates friction fast.

Submitting vague drawings. Freeholders prefer detailed, accurate plans, not sketches.

Confusing planning permission with freeholder consent. They’re completely separate processes.

Underestimating timeframes. A Licence to Alter can take weeks or even months to finalise.

A bit of preparation early on can save you a lot of frustration later.

Practical Tips for a Smoother Process

Read your lease first. Know exactly what it says about alterations.

Get good drawings. Clear plans with notes and measurements help freeholders and surveyors say “yes” faster.

Speak to your managing agent. They’ve seen hundreds of applications and can flag potential issues early.

Budget properly. Expect to cover the freeholder’s legal and surveyor fees.

Keep communication friendly. Courtesy emails and updates go a long way — especially in shared buildings.

Final Thoughts

A Licence to Alter isn’t there to slow you down — it’s there to protect the building and everyone who lives in it.

Understanding what it covers (and what it doesn’t) can save you a lot of time, money, and hassle. It’s not about red tape; it’s about making sure changes are safe, reversible, and fair to your neighbours.

If you’re ever unsure, ask before you act. A five-minute check with your managing agent or lease advisor can prevent months of headaches later on.

In London’s dense mix of converted houses, mansion blocks, and new developments, shared structure means shared responsibility. The Licence to Alter exists to keep that balance — protecting your home, your neighbours, and the building as a whole.

Upholstery Care Tips for Budget-Friendly Property Owners

You’ve stretched every pound to furnish your rental, so you want those sofas to last. Forget expensive gadgets—simple habits like rotating cushions and blotting spills keep fabric fresh. 

Vacuum seams weekly, not yearly, and test any cleaner on a hidden patch first. If spills turn stubborn, checking local guides on upholstery cleaning in Hampstead can show you affordable DIY fixes before you call in the pros for a fresher look.

Vacuum Regularly, Avoid Over-Wetting

Dust, grit, and pet dander grind into fabric every time someone sits down, so a quick vacuum session once a week protects fibers and keeps colors bright.

  • Use the right attachment. The small upholstery nozzle reaches crevices without scratching wood trim or pulling decorative threads.
  • Go slow and cross-hatch. Two passes—first length-wise, then width-wise—lift embedded soil that a hurried swipe misses.
  • Mind moisture levels. Handheld “spot extractors” feel handy, yet flooding cushions breeds mildew, rusts springs, and voids most furniture warranties.
  • Blot, don’t drench. For spills, press an absorbent towel firmly; over-wetting is the #1 error technicians see when repairing DIY cleanups.
  • Schedule deep cleans wisely. Professional low-moisture methods such as those at Bock’s Steam Star leave fabrics touch-dry in hours, preventing musty odors before they start.

Weekly vacuuming, combined with moisture-smart blotting, dramatically extends the life of every sofa, sectional, or headboard without costing a dime in replacement fabric.

Spot-Test All Cleaning Products

Labels, codes, and little-known solvents make upholstery chemistry feel intimidating, yet twenty seconds of testing prevents permanent rings, fading, and stiff “clean” patches later.

Decode the cleaning tag

Most cushions carry W, S, WS, or X codes. Matching cleaner to code keeps warranties intact and eliminates guesswork when you tackle future stains.

Create a testing zone

Pick the skirt’s underside or the back corner, then spray, blot, and wait until completely dry; any change here saves heartbreak on the armrest.

Allow full drying time

Many disasters appear only after moisture evaporates, so give the test area at least two hours before deciding a solution is truly fabric-safe.

Immediate Stain Treatment Hacks

Coffee, ketchup, and crayon marks happen fast; treating them within five minutes stops pigment from setting and keeps Saturday mornings free of scrubbing marathons.

Blot, never rub

Firm, downward pressure transfers liquid into the cloth instead of shredding fibers or spreading the spill into a dinner-plate-sized smudge.

Raid the kitchen

Mix a teaspoon of clear dish soap with warm water for food stains, or dab rubbing alcohol on ink—both are safe for most synthetics.

Lean on cold club soda

The fizz lifts tannins from coffee and wine; pour sparingly, blot repeatedly, and finish with a dry towel to prevent watermark rings.

Try parent-approved tricks

Parents swear by baby wipes for fresh messes because the mild solution dissolves sugars yet leaves no foamy residue—perfect during movie-night mishaps.

Know when to call pros

If a stain darkens after drying, professional hot-water extraction can still rescue it; quick photos help technicians choose the right pretreatment.

Deodorize With Baking Soda

Pet naps, onion dip, and humid weather create odors that linger long after visible crumbs are gone; baking soda neutralizes them for pennies per couch.

  • Vacuum first. Removing loose soil lets the powder contact actual odor molecules instead of forming grimy paste on surface dust.
  • Sprinkle generously. A snow-like layer over seats, backs, and arms ensures full coverage; don’t forget beneath removable cushions.
  • Work it in lightly. A soft brush pushes crystals between fibers where smells hide without matting delicate weaves.
  • Wait sixty minutes. Extra time equals extra freshness, especially in humid climates or homes with multiple pets.
  • Vacuum thoroughly. Slow overlapping strokes lift every grain, leaving fabric refreshed and ready for guests.
  • Repeat monthly. Consistent deodorizing prevents mustiness from ever taking hold, saving money on scented sprays.

For a deeper dive into odor-busting science, Family Handyman recommends this exact method in their step-by-step couch guide.

Budget-Friendly Steam Cleaning

Nothing beats the sanitizing power of steam, and modern handheld units make DIY deep cleaning possible without shelling out big bucks for commercial rentals.

Choose a low-pressure model

Excessive PSI drives moisture into padding, so look for machines capped at under 60 PSI with adjustable flow and microfiber bonnet attachments.

Pre-vacuum and pre-treat

Steam melts oils; removing dry soil first prevents muddy sludge and allows heat to reach buried grime rather than surface dust.

Use distilled water

Mineral-free steam avoids chalky rings on dark fabrics and extends the life of your appliance by preventing internal scale buildup.

Work in small sections

Pass the wand slowly, overlapping each stroke; then towel-blot immediately to capture loosened soil and accelerate drying time.

Speed-dry with fans

Box fans or ceiling fans slash drying to under two hours, removing any chance of mildew while letting you reclaim the living room sooner.

Rotate And Fluff Cushions

Cushions compress unevenly in favorite seats, but strategic rotation and daily fluffing distribute wear, preserving loft and preventing that lopsided, saggy-sofa look.

Set a calendar reminder

Monthly rotation—left to right, front to back—evens pressure points so foam cores recover instead of packing down permanently in high-traffic corners.

Master the karate chop

Grasp each side, give a firm smack in the center, then shake; this redistributes feathers or fiberfill for that showroom “crowning” effect.

Air them out

Sunny, breezy afternoons are perfect for propping cushions outdoors, letting UV rays and ventilation banish odors while moisture evaporates naturally.

Check zipper seams

Loose stitching invites leaks of down or clusters; quick hand-sewing now prevents messy blowouts and costly insert replacements later.

Replace batting when needed

After five to seven years, even quality foam tires; inexpensive polyester wrap restores shape without buying an entirely new sofa.

Use Fabric Protector Spray

A clear, breathable barrier repels spills long enough for blotting, drastically reducing permanent stains and stretching professional cleanings further apart on tight budgets.

  • Start with clean fabric. Spraying over dirt locks grime beneath a plastic-like shell that later cracks and attracts even more soil.
  • Hold can twelve inches away. Fine mist coverage prevents blotchy buildup that can darken light colors or stiffen delicate linens.
  • Apply two light coats. A second pass after thirty minutes ensures complete fiber encapsulation without drips or tacky residue.
  • Ventilate well. Open windows or use fans; solvents dissipate quickly but need airflow to cure into an invisible shield.
  • Reapply annually. High-use items like dining chairs might benefit from semi-annual treatments, especially in homes with children or pets.

Products such as Furniture Clinic’s Carpet & Upholstery Protector deliver Scotchgard-level defense at DIY prices and are widely available online.

DIY Microfiber Couch Care

Microfiber resists water yet attracts oily fingerprints; specialized cleaning keeps its suede-like nap silky while avoiding the dreaded blotchy watermark syndrome.

Identify the care code

“S” means solvent only, “W” accepts water-based cleaners, and “S-W” allows either. When tags are missing, always default to a conservative solvent test.

Vacuum and brush first

Removing surface debris protects the nap from matting, ensuring even cleaner penetration and restoring a uniform, velvety appearance after drying.

Clean in stripes

Work top to bottom in eight-inch bands, lightly misting and blotting each before moving on to avoid tide marks from overlapping wet and dry zones.

Revive the nap

Once dry, a soft-bristle brush or dry sponge combs fibers upright, eliminating stiffness and restoring that fresh-from-the-showroom hand feel.

Finish with protector

A solvent-safe fabric guard keeps future spills beading on the surface, making next month’s cleanup even easier and protecting resale value.

Lasting Savings

You now have pragmatic tools to keep upholstered pieces presentable without draining reserves. Apply them consistently, rely on observation, and adjust tactics when fabric or budget demands. Small, regular efforts prevent costly replacements, stretch rental income, and spare landfill space. Your furniture, tenants, and wallet all quietly benefit in return.

Real Estate Digital Marketing Guide for Beginners

The real estate industry has become highly competitive, and digital marketing now plays a key role in attracting clients and closing deals. Real estate professionals who use online platforms effectively can showcase properties, reach local and global audiences, and build strong brand recognition. A well-planned digital strategy helps create trust and visibility in a crowded market.

For beginners, learning the basics of digital marketing is an excellent starting point. From creating an optimized website and using SEO to leveraging social media and video marketing, there are many tools to boost your reach. This guide explains simple yet effective strategies to help you grow your real estate business online.

Build a Strong Real Estate Website

A professional and user-friendly website is the foundation of your real estate digital marketing strategy. It serves as your online office, where potential clients can explore property listings, learn about your services, and contact you directly. Make sure your website is mobile-responsive, loads quickly, and includes high-quality images of your listings. Adding features like search filters, location maps, and clear contact forms can significantly improve user experience and keep visitors engaged.

To attract more traffic, optimize your website for search engines by using relevant keywords such as “real estate listings” or “homes for sale near me.” Include detailed property descriptions, blog posts, and testimonials to build credibility and trust. Regularly updating your site with fresh content also helps improve visibility on Google. A strong website not only showcases your properties but also strengthens your brand presence and increases lead generation opportunities.

Optimize for Local SEO

Optimizing for local SEO is essential for real estate professionals who want to attract clients in specific areas. By focusing on local search terms like “homes for sale in [city]” or “real estate agent near me,” you can improve your visibility on search engines and connect with buyers actively looking in your area. Creating and maintaining a Google Business Profile is crucial, as it allows your business to appear in local map searches, display reviews, and provide accurate contact information, making it easier for potential clients to reach you.

In addition to Google listings, ensure your website includes consistent NAP (Name, Address, Phone) details across all online directories. Encouraging satisfied clients to leave positive reviews can boost your credibility and improve rankings in local searches. Incorporating localized content, such as neighborhood guides or area market insights, not only enhances SEO but also positions you as an expert in your region. These strategies collectively help generate more targeted leads and increase your real estate business’s online presence.

Leverage Social Media Marketing

Social media marketing is a powerful tool for real estate professionals to connect with potential clients and showcase properties. Platforms like Facebook, Instagram, LinkedIn, and TikTok allow you to share high-quality images, virtual tours, client testimonials, and market updates. Consistently posting engaging content helps build trust, strengthen your brand, and increase visibility among your target audience. Using platform-specific features, such as Instagram Reels or Facebook Stories, can further enhance engagement and reach, attracting more potential buyers and sellers to your listings.

Paid advertising on social media can also amplify your efforts. Targeted ads allow you to reach specific demographics, locations, and interests, ensuring your listings are seen by the right audience. Engaging with followers through comments, messages, and interactive posts encourages relationships and builds credibility. Additionally, monitoring analytics helps identify which types of content perform best, allowing you to refine your strategy for maximum impact. Leveraging social media effectively creates a strong online presence that supports long-term growth for your real estate business.

Use Video Marketing to Engage Buyers

Video marketing has become an essential strategy for real estate professionals looking to engage buyers and showcase properties effectively. Creating property walkthroughs, neighborhood tours, and client testimonial videos helps potential buyers visualize their future homes and builds trust in your services. Platforms like YouTube, Instagram, and Facebook are ideal for sharing these videos, increasing engagement and reach. Using tools like invideo, a user-friendly online video editor, allows you to produce professional-quality videos quickly, even if you have limited technical experience. High-quality videos can significantly improve your online presence and attract more leads.

In addition to showcasing properties, videos can highlight market trends, tips for buyers, and behind-the-scenes glimpses of your real estate business. Engaging content keeps your audience interested and encourages them to share your videos, expanding your reach organically. With the help of an online video editor like invideo, you can add captions, transitions, and branding elements to make videos more professional and shareable. Consistently using video marketing strengthens your credibility and helps you stand out in a competitive real estate market.

Run Paid Advertising Campaigns

Running paid advertising campaigns is an effective way for real estate professionals to reach potential buyers and generate leads quickly. Platforms like Google Ads, Facebook Ads, and Instagram Ads allow you to target specific demographics, locations, and interests, ensuring your listings are seen by the right audience. Creating compelling ad copy, high-quality visuals, and clear calls-to-action can increase engagement and click-through rates. Setting a defined budget and monitoring ad performance regularly helps you maximize your return on investment while attracting qualified prospects to your website or property listings.

Retargeting campaigns are particularly valuable in real estate marketing. By reaching users who have previously visited your website or engaged with your content, you can reinforce your brand and encourage them to take action. Tracking metrics such as impressions, clicks, and conversions provides insights into which ads are most effective, allowing you to refine your strategy. Combining paid advertising with organic marketing efforts creates a balanced approach that drives visibility, builds trust, and ultimately helps grow your real estate business.

Create Social Media Videos Using a Video Maker App

Creating social media videos using a video maker app is an effective way for real estate professionals to showcase properties and engage their audience. Modern apps often include AI-powered features that help automatically edit clips, enhance visuals, and add professional effects, making video production faster and more efficient. By highlighting property details, neighborhood insights, and client testimonials, your videos can attract potential buyers and increase interest in your listings. Sharing these videos on platforms like Instagram, Facebook, and TikTok boosts visibility and encourages engagement, helping your real estate business reach a larger and more targeted audience.

AI-driven video maker apps also allow you to optimize videos for different social media formats, including short Reels, Stories, and feed posts. Features like auto-captioning, smart transitions, and automated background enhancements make your content more professional and engaging. Regularly posting videos keeps your audience interested, builds credibility, and positions you as a knowledgeable real estate professional. 

Track and Analyze Your Marketing Performance

Tracking and analyzing your marketing performance is essential for improving the effectiveness of your real estate digital strategy. By monitoring metrics such as website traffic, social media engagement, and lead generation, you can identify which campaigns are driving results and which need adjustment. Tools like Google Analytics, Facebook Insights, and CRM dashboards provide valuable data on user behavior, click-through rates, and conversions. Regular analysis helps you make informed decisions, allocate resources wisely, and optimize your marketing efforts to reach potential buyers more efficiently, ultimately enhancing your overall return on investment.

In addition to tracking quantitative metrics, evaluating qualitative feedback is equally important. Client inquiries, comments, and reviews offer insights into how your audience perceives your brand and services. Using this information, you can refine messaging, improve content strategies, and address any gaps in your marketing approach. Consistently monitoring and analyzing performance ensures that your real estate business stays competitive, maximizes engagement, and achieves sustainable growth through data-driven decision-making.

Conclusion

Effective digital marketing is a game-changer for real estate professionals looking to grow their business and reach more clients. By building a strong website, optimizing for local SEO, leveraging social media, and incorporating video marketing, beginners can establish a powerful online presence. Paid advertising, social media videos, and performance tracking further enhance visibility and lead generation. Consistent implementation of these strategies helps build trust, showcase properties effectively, and attract qualified buyers. Embracing digital marketing tools and techniques ensures long-term growth, making your real estate business more competitive and successful in today’s online-driven market.

Renovation Ideas that Make Your Bathroom a Cocoon of Relaxed Luxury

Waterfront lifestyle is a prominent feature in Cape Coral, Florida. You will find both premium properties and simple ones that blends indoor and outdoor energy in an effortless manner through screened-in pools and lanais. Most of the modern homes reflect evolving urban desires, where comfort meets luxury and tropical vibes are everywhere. And often, the best place to enjoy this pleasant experience in privacy is the bathroom. If your bathroom has lost its luster or your needs have outgrown it, consider renovating this space. You can transform it into a mini-vacation retreat with exquisite features, breezy finishes, and more. These elements remind you that slowing down is also essential. 

Who should you approach for this project? If you search for bathroom remodeling Cape Coral online, top contractors will appear. Contact them for a consultation. Initial discussions will help determine whether they are the right fit for your needs. Nevertheless, a beautiful bathroom in Cape Coral can include some of the following elements in its refreshed design:

  • Bathroom tiles

To capture the calm and luxurious vibe of Florida, bathroom walls and floors can be finished with ceramic tiles in coral, sand, and aqua tones. The shower area can feature herringbone patterns, while the flooring can be done in mosaic. There should be a cohesive balance between colors and textures to enhance the visual appeal. An upscale bathroom in Florida calls for this kind of thoughtful design.

  • Cabinetry

An established contractor can customize everything for you, which is crucial if you intend to build a high-end bathroom from every perspective. Since bathroom cabinets often occupy a significant amount of floor space, you have to choose them more carefully. What material should you choose for Florida’s humid climate and occasional cool weather? Wood can be ideal, especially teak or cedar. You don’t have to go for floor-standing cabinets. To create a spacious feeling in the bathroom, floating vanities are the best. They can feature soft-close drawers and other interesting details to maintain a relaxed mood in the room.

  • Heated flooring

During winter, mornings can feel slightly chilly in Florida. It can be uncomfortable to step onto a cold floor while going about your daily routine. Why don’t you ask your contractor about options that will help you avoid this experience? Heated flooring systems are generally recommended. These are installed under the tile flooring to provide continuous warmth. Modern heated floors come with programmable thermostats to help you save energy. 

  • Lighting fixtures

If the bathroom is to feel like a spa, the lighting must be carefully considered as well. Ordinary lighting won’t add much, but lights that create beautiful shadows or emit a warm glow can be perfect. Think of golden sconces or unique glass pendants. You can also opt for chandeliers above the bathtub area to add visual drama. At the same time, there should be enough space for accent lights, task lights, and ambient ceiling lights.If you wish to transform your bathroom, visit Goyaldevelopment.com/. Professionals can better understand your needs and fulfill them effectively.

Bathroom Renovation Ideas to Make Your Space Spa-Like

Transforming a bathroom into a spa-like retreat is one of the most rewarding home renovation projects. A spa-inspired bathroom offers a sanctuary from the stress of daily life, combining tranquility, luxury, and functionality in a single space. Whether you’re working with a compact powder room or a spacious master bath, thoughtful design choices can elevate the experience and bring the serenity of a spa into your home. From soothing aesthetics to indulgent features, the journey to a spa-like bathroom begins with a clear vision and a commitment to comfort.

Embrace a Calming Color Palette

Color plays a powerful role in setting the mood of a space. Spa-like bathrooms often feature soft, neutral tones that evoke calm and relaxation. Shades of white, beige, taupe, and pale gray create a clean and airy atmosphere, while muted blues and greens can add a touch of nature-inspired tranquility. The goal is to avoid harsh contrasts and instead opt for harmonious hues that promote peace. Matte finishes and natural textures further enhance the soothing effect, making the space feel more grounded and inviting.

Upgrade to Luxurious Materials

Materials are the foundation of bathroom renovation Manhattan, and choosing high-quality finishes can instantly elevate the bathroom’s ambiance. Natural stone, marble, and quartz countertops offer elegance and durability. Wood accents, such as teak or bamboo, introduce warmth and a spa-like aesthetic reminiscent of upscale retreats. Glass shower enclosures, ceramic tiles, and brushed metal fixtures contribute to a polished look while maintaining a sense of openness. Investing in materials that are both beautiful and functional ensures that the space remains timeless and easy to maintain.

Incorporate a Freestanding Tub or Walk-In Shower

A signature feature of spa bathrooms is the presence of a freestanding soaking tub or a spacious walk-in shower. Freestanding tubs serve as a focal point and invite long, relaxing baths. Their sculptural design adds visual interest and a sense of luxury. For those who prefer showers, a walk-in design with frameless glass doors and multiple showerheads can replicate the experience of a high-end spa. Rainfall showerheads, body jets, and steam options enhance the sensory experience, turning daily routines into moments of indulgence.

Focus on Lighting for Ambiance

Lighting is essential for creating a spa-like atmosphere. Natural light is ideal, so maximizing windows or adding skylights can make a significant difference. For artificial lighting, layering is key. Ambient lighting provides overall illumination, while task lighting near mirrors ensures functionality. Accent lighting, such as LED strips under vanities or behind mirrors, adds depth and drama. Dimmable fixtures allow you to adjust the mood, transitioning from bright and energizing in the morning to soft and calming in the evening. Warm light temperatures are preferred for a cozy and relaxing feel.

Add Elements of Nature

Bringing nature into the bathroom enhances the spa-like experience. Plants not only purify the air but also add color and life to the space. Ferns, orchids, and peace lilies thrive in humid environments and require minimal maintenance. Natural materials like stone, wood, and woven baskets reinforce the connection to the outdoors. Water features, such as small fountains or decorative bowls, can introduce soothing sounds. The presence of nature fosters a sense of balance and well-being, making the bathroom feel more like a retreat than a utility room.

Prioritize Comfort and Functionality

Comfort is at the heart of any spa-inspired bathroom. Heated floors provide warmth during colder months and add a touch of luxury. Soft-close drawers, ergonomic fixtures, and ample storage contribute to a seamless experience. Seating options, such as built-in benches or cushioned stools, offer convenience and relaxation. Towels, robes, and bath mats made from plush, high-quality materials enhance the tactile experience. Every detail should be considered with comfort in mind, ensuring that the space supports both relaxation and practicality.

Introduce Aromatherapy and Sound

Sensory elements play a crucial role in creating a spa-like environment. Aromatherapy can be incorporated through essential oil diffusers, scented candles, or bath products. Lavender, eucalyptus, and chamomile are popular choices for promoting relaxation. Sound also influences mood, so consider adding a waterproof speaker system or sound machine. Gentle music, nature sounds, or guided meditations can transform the bathroom into a holistic wellness space. These additions engage the senses and deepen the feeling of escape and rejuvenation.

Personalize with Thoughtful Details

A spa-like bathroom should reflect your personal style and preferences. Artwork, decorative trays, and curated accessories add character and charm. Minimalist design encourages a clutter-free environment, but that doesn’t mean the space should feel sterile. Choose items that bring joy and comfort, whether it’s a favorite candle, a beautiful vase, or a framed print. Personal touches make the space feel intimate and tailored, enhancing the overall experience.

Conclusion

Renovating a bathroom to create a spa-like space is an investment in comfort, wellness, and daily joy. By focusing on calming colors, luxurious materials, thoughtful lighting, and sensory enhancements, you can transform an ordinary room into a personal sanctuary. The key is to balance aesthetics with functionality, ensuring that every element contributes to a harmonious and restorative environment. Whether you’re soaking in a freestanding tub, enjoying the warmth of heated floors, or simply savoring the scent of lavender, a spa-inspired bathroom offers a daily escape that nurtures both body and mind. Transform your space into a masterpiece of modern design with expert craftsmanship from NYCrenovation.com.